The year started off strong and then momentum waned after a big family vacation over the summer.
The spring months were spent finally finishing the Mines of Xenon graphic novel. I had to complete the manuscript with additional photography, manipulate the images to comic style and do the layout. The finished product wasn’t half bad and in addition to the story line, had an additional section for “concept art” for motive power and rolling stock. I also had a lot of fun making an old-timey back page with corny ads for novelties you could order by mail. All with sci-fi inside jokes, of course.
The balance of energy for the rest of year was spent on the Italy Med layout (based on the Disney movie Luca). The town hall, plaza statue, and a couple of small shops on the west side were built. I started acquiring and painting figures to place on the layout.
Towards the end of the year, I started experimenting with photogrammetry (3D scanning with smart phone) and 3D printing. Also started sculpting my own figures and generating figures using AI. I’ve printed one figure from a 3D scan, so it seems to work in principle. I’m looking forward to printing out some unique characters to populate my seaside town in 2024.
The Mines of Xenon sci-fi model railroad is featured on “DIY and Digital Railroad” YouTube channel in the October 2023 issue of Virtual Model Railroad Show. Thanks Jimmy!
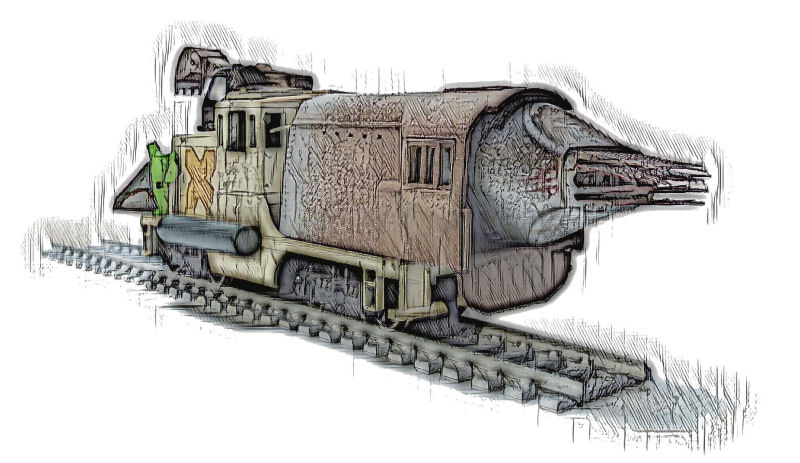
The comic book based on the science fiction model railroad The Mines of Xenon is now in review stage. A section of the comic book is a set of faux concept drawings in architect style. This is done by applying a filter and editing photographs taken on my cell phone. This helps promote the illusion of an imagined world.
I thought I would post a few preview samples here.
Some other commitments kept me from fully achieving my goals for the past year, but I made some good progress, nonetheless.
I tackled two main modeling projects. First was a diorama modeling a metaphor of the “Approach to the Cave” stage of the story form known as the Hero’s Journey. The cave, hillside, and landforms were all carved out of 2″ XPS foam, complete with lava pit. The hero, now leveled up and separated from his allies, plans to enter the cave of his heart where he must confront his darkest fear – himself.
Dollar store action figures are used to represent the hero, his allies, and enemies, as well as a dragon in the depths of the cave. He must get past the dragon, as well as the shadow of his own self, seize the sword, and abscond with the treasure. The landscape is laden with snares and traps to trip him up.
Approaching the cave from the Hero’s JourneyThe Hero scopes out the land and what stands between him and the thresholdConfronting what’s inside the cave of the heartSeizing the swordThreshold guardians
Second was continued work on the mini layout of Portorosso from Disney Pixar’s Luca. I worked on the beach and buildings, as well as getting a trolley running point-to-point with a circuit from Azatrax. I really like it and it was easy to hook up. The infrared detectors are a little sensitive, especially when working around scenery. Water from the beach and shallow dock area is 2-part epoxy tinted with acrylic. The pier pilings were hand made using a technique from Jason Jensen. Again, all landforms roughed in using XPS foam. Structures all scratch build using foam core with the paper removed. Next up is the city hall. Details from various manufacturers.
Next up? For the coming year, I’ll continue to work on Luca and build out the town. It could involve custom 3-D scanning and printing to get some more details. I’m also hoping to complete a graphic novel to go with the Mines of Xenon space layout.Finally, is the year I hold an open house? It could also involve some train room and workshop prep and investment, which also got some attention this past year.
The port of Portorosso is coming together. This view shows the electronics of the underside of the top layer.Making roof tilesA block of businesses and buildings down by the waterfrontOverhead view of the portBuilding Julia’s house from foam core with the outer layer of paper removedAnother view of the port. The 3-D printed figure in the center will become the town’s water fountain.Julia’s housePortorosso: theirs and mineJulia’s house: theirs and mine
In preparation for 2023, I can believe I didn’t do a year in review for 2021. Has it been that long?
Here is a quick look back of some of the things I tackled during the year.
A few more details got added to the Southside Industrial Districting HO switching railroad. The Morden diorama was polished, detailed, and finished off. The Mines of Xenon sci-fi model railroad got to essentially a completed state and work began on documenting the layout in graphic novel form.
I started a new job and splurged by purchasing a Minuetto in Leonardo Express livery from ViTrains. This model is out of production and after several months of hunting, I found the manufacturer had 1 remaining and shipped direct from Italy. Score!
Disney / Pixar releases the movie Luca. It is a cute little production that our family just fell in love with. Instead of moving on to create the dream model railroad, I get sidetracked and start a mini layout based in the fictional Mediterranean town of Portorosso. Work starts in earnest, and I even have a place to pose my Minuetto! Construction will be using foam insulation for the land forms and foam core for the custom structures of the town.
Enjoy some scenes from throughout the year.
The Southside Industrial District HO scale switching layoutMorden Underground station on London RoadA London Underground stationThe survivors “borrow” and digger from the Xenon Mining CorporationA buddy bot comes in useful both down in the mines as well as on the surface of the planet Xenon IIIThe pilot and his trusty sidekickHeading off to relax after a hard day’s workMoving tonnage at the Mines of XenonThe Leonard Express runs between Rome’s Fiumicino Airport and the downtown Termini train stationTown of Portorosso from Disney/Pixar’s movie Luca. Copyright belongs to original artist and owner. No infringement is intended.Starting my own port town for the Luca mini layoutA study in building structures with foam core. HO scale San Francisco from Bachmann.
Whether you’re a super hero or space pirate, moisture farmer or dark lord, every one needs a friend. That’s why I’ve built my own buddy bot.
This is a really easy project and one you can do in an evening. I was inspired by the orb outside the Mos Eisley cantina, which I still don’t know exactly what it is. I was buiding my own cantina scene in roughly HO scale (1/87) and started looking around for some base parts I could modify. Something about the size of a ping pong ball, but I wanted more features and texture that was already molded into the surface.
The bottom half of the prototype looked a bit like a cap from a 2-litre cola bottle, so I started going in that direction. I got a cap, but it was a bit too blocky and not rounded quite enough. It look like, well, a bottle cap. Then I found in my junk box a small cap that I had set aside because it looked a bit like the cockpit of an old WWII bomber. The question was what was the original source and could I get more?
Ah yes, it came from bottled water. So went on a trek of all the convenience stores I frequent, in search of the specific brand. I soon found it, along with a new product the cap of which could potentially work as the other half. I secured several plastic bottle tops and went to work finding the best combination to create something realistic, yet other worldly.
Voila! The medium clear cap fit perfectly within the large cap to make … a thing. The fit was almost perfect. Serendipity showed up again. It seemed a little large for the scale of my existing model and it needed some extra bits or greebles placed on the side to give it some character. I tacked on some more pieces from my junk box and it looked pretty good. When I placed it beside my completed cantina, it was a little large.
It looked better sitting beside one of my 3-inch figures. What if I made this a campanion robot? Something was still missing. That sense of anthropomorphism was lacking. I needed something to give a human-like appearance like arms, legs, or a head. I browsed through some articles about making mechs, but it all seemed too complited. Taking some more inspiration from the Gonk droid, I would keep it simple and just add some legs. I knew I could fashion my own from bits and pieces, but could I find something that was almost complete so I could repeat it.
I remembered back on some space marine models I had that just might fit the bill. Sure enough, a trip to the dollar store yeilded a playset series that would work. I bought a multi-pack so I could have some options. The figures are sectional and the legs come off as a unit. I was going to glue each one to a side of my cluster, but keeping the structure of the leg assembly worked better. They come with a small nub and I simply cut a hole in the bottom of my new creation and the legs stay in with friction. The legs are jointed and can be posed for various positions. I didn’t glue the assembly, so I can swap out legs from other figures for variety.
I primed the main assembly with a black bomb and then did a second coat of classic “space beige” (ivory). The added-on details were dry brushed various colors, then rust weathering added, followed by an Indian ink was to dirty it up and bring out the details. I didn’t paint the legs, other than dry brushing a contrasting color to fill in the nooks and crannies.
Since the component pieces are “stock” from readily available sources, you can make variations quickly and easily. I did manage to get one with the cola cap. The extra bits and pieces come from the junk pile, so each one ends up being unique. Add a “head” unit, eyes, or arms if you wish. Swap out the legs or have one model with no legs.
The first model I did worked well, but the glue didn’t hold on the second one I tried to make. I found the following order gives the best results: glue the pieces including greebles, prime with a black paint for plastics, then cover with the final color, and dry brush the greeble details if desired. Finish with weathering washes and powders to suit.
I was really happy with the results and it is one of my favorite models. Sometimes I pull him from the diorama and set him on my desk for fun. His name is Robbie.
Lockdown 2020 comes to the Southside Industrial District
I actually made some progress in the year that was 2020, either because or in spite of, the lockdown and some changes in my personal employment. I got several projects to what I consider the completed stage.
Working on the railroad – Southside Industrial District
As for the Southside Industrial District, it is pretty much finished, except for the inevitable tweaks and detailing. There may be a sign here or a figure there to add, but there won’t be any major developments going forward.
Cover proofs for the “Building The Southside Industrial District” book. I’m going with the one on the left.
In a related note, I finished the content and proof printing of my book “Buiding the Southside Industrial District – How I Made an HO Scale Urban Switching Model Railroad.” A few format changes and I hope to print the final copy in the next weeks. This book is mainly for me to record the creation of the switching layout for my own use.
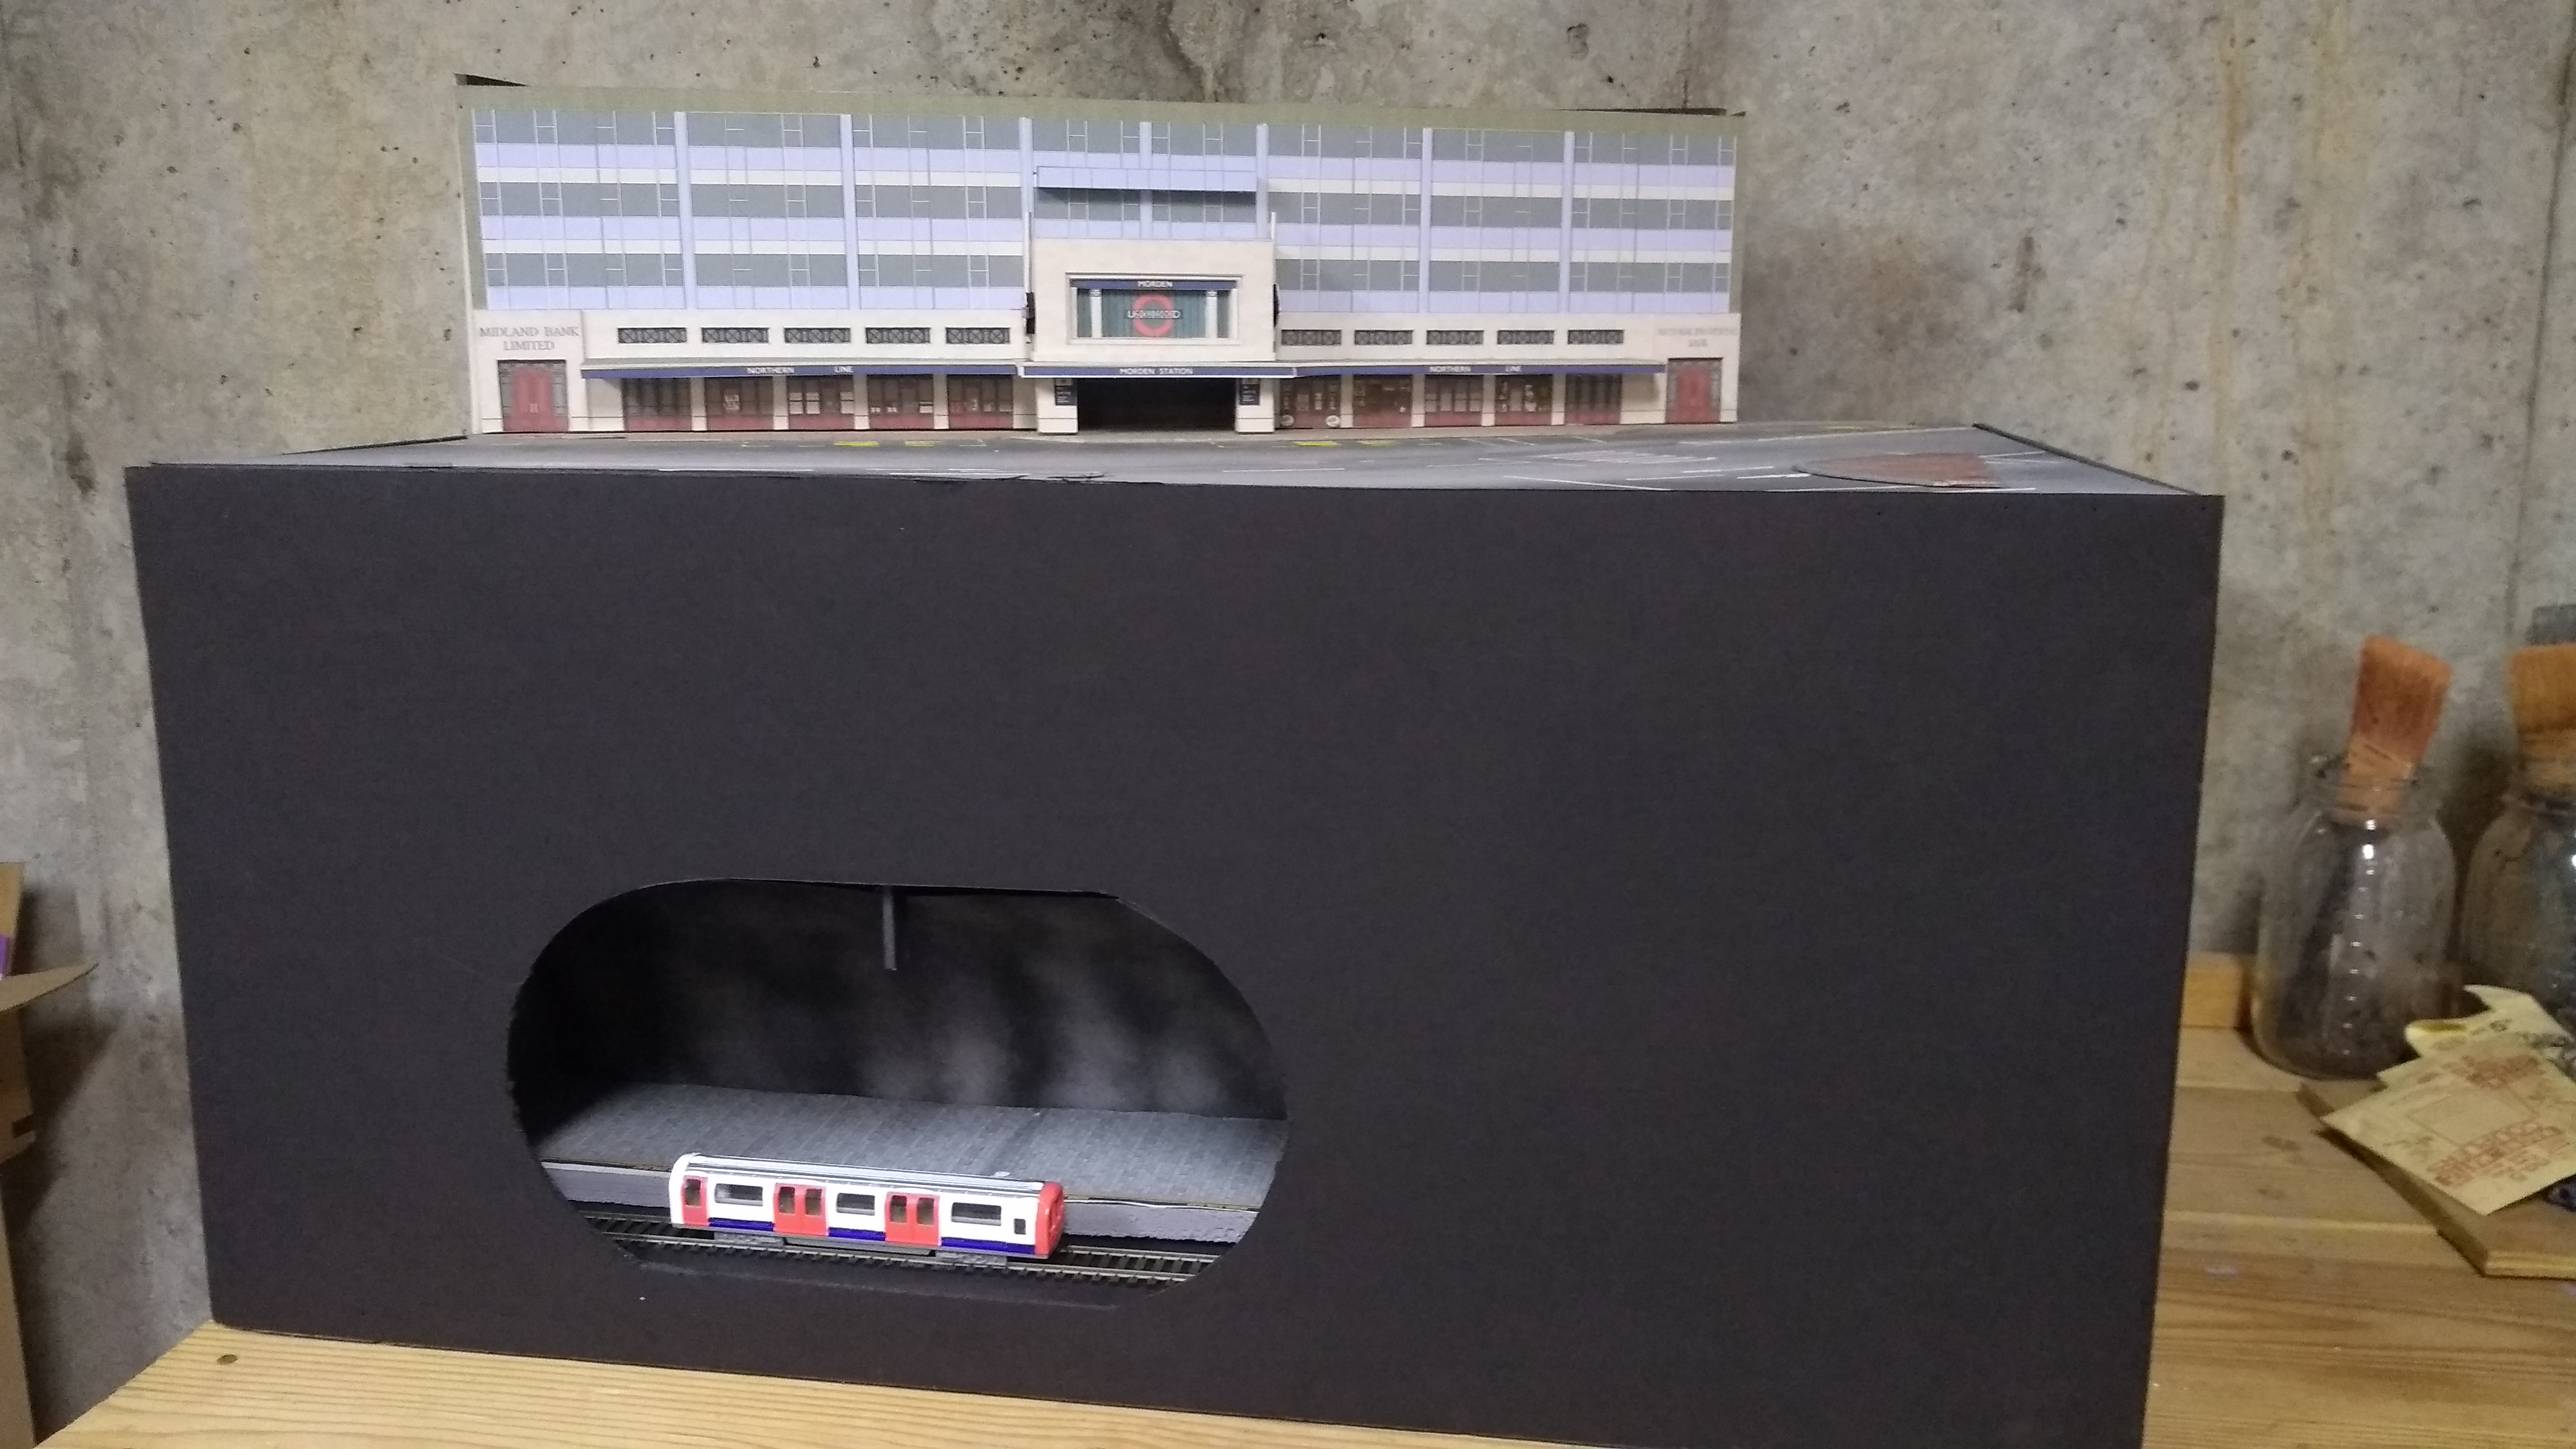
A day in the life of the London Underground at Morden Tube Station with four fabulous guys in the crosswalk.
With a 3D printed London Underground stock carriage, I also wrapped up the Morden diorama. I completely redid the station building from a printed cardstock kit to a scratch built styrene and acetate plastic window glazing model. It was my first attempt at a 3D object (designed by another and bought by me on Shapeways) and it is definitely a static as opposed to a working model. It is good enough for the diorama, but next I would like to acquire some proper running stock. Making some adverts for the platform was fun and a few more details and figures concluded the work on the diorama.
Ballasting the Turbo Train line on the Mines of Xenon Sci-fi Model Railroad
Xenon, the sci-fi model railroad set in space, got a little bit of attention near the end of the year. Mostly, I just laid the white ballast and prepared to make the last structures and rolling stock.
Mines of Xenon sci-fi turbo train
Finally, with so many projects coming to a close, I started dreaming and working on the next layout. The space and track plan is in my head for a passenger oriented railfan layout. I got to work by purchasing a few kits to start on a mixed use renovated harbor scene based on the power plant in Baltimore.
The Power Plant at Baltimore’s Inner Harbor inspires the next layout
Broad goals for the upcoming year include getting a final print of that book, finishing the structures on the sci-fi layout and potentially a related book, and starting that next layout, perhaps with a diorama. The beginnings of a possible project were hatched this past year with the idea of taking a layout to share with ill or disadvantaged children. We’ll see where that goes.
When things got dark, I would head to the basement to run some trains. Sometimes the circumstances called for slow motion industrial switching and sometimes the soothing rhythms of running in circles was the ticket I needed. Here’s to wishing you a great year where you can play with some trains and all your dreams come true.
What does the future hold for the Southside Industrial District?
End of the Line?
They say a model railroad is never finished. I know I have a lot of plans bouncing around in my head for changes, additions and upgrades for the Southside Industrial District. But we all have a limited amount of time and my interests are starting to expand. As a typical model railroader, I want to get onto the next thing and build something new.
Details
Several buildings need a few things to finish them off, whether it be window glazing, signs, or interior modeling. There are lots of details to add, too. Adding details can bring a scene – as well as the entire railroad – to life. For several years now, I’ve saved signs from the Internet, just waiting for some extra time to print them out and hang them. Figures add interest and give a sense of movement, if even frozen in time.
The Southside gets a visit from a subway car coming from the newly connected passenger line
There is also lighting. I’ve just now been playing around with lighting inside structures and there is a whole world to explore there. These days, you can animate as well as light up those detailed interiors. Of course, I will have to photograph all this modeling when it is complete.
More Layouts
I used to have all kinds of ideas and wondered how I would make them all fit onto my layout, and how they would look together. Now I’ve learned that I do better with smaller, focused layouts that can have their own identity. I can build one thing and move on to the next. Not only does it limit the scope of what I am doing so I can achieve a completed state, but I can keep moving from project to project so I don’t get bored.
London Underground diorama
Right now I am pretty far along with a layout that will take me half way across the galaxy, as well as the OO scale (1:76) Underground diorama that finds me below the streets of London. Naturally, I will document everything along the way, so that’s another book right there.
I’m also planning my next passenger-centric layout (bigger and better, of course!) and the London Underground exhibition layout to build with a friend.
It has been a good journey. I’m happy to say I think the layout turned out even better than I could have imagined when I pulled those boxes out of storage more than nine years ago. And I’m still learning along the way.
Who knows? Some day you might see a sleek, modern tram pick up some weary workers on their way home from the Third Street Deli on the Southside Industrial District.
The turbo train heads to the mines on the planet Xenon III
The RIP track on the Southside Industrial District
A great space saving “industry” for a small model railroad, a RIP track is a fun way to cram a lot of action into a compact area.
“RIP” stands for Repair In Place and is the area designated by the real railroads to do light maintenance without having to haul rolling stock back to the main car shops. Typically, they are adjacent to yards, but they can be located anywhere traffic volume or operations warrant it.
The RIP track sits on on the edge of the District with businesses in the background.
I think RIP tracks make great modeling subjects for several reasons. First, they don’t demand a lot of trackage. As few as two car spots is suffucient to get some traffic movement during an operating session. Second, they don’t require a large structures or real estate and can fit in any shaped area or corner. Third, since all equipment eventually wears down and needs repairs, literally any type of car or motive power can be spotted there. Finally, the open-air maintenance facilities are ripe for modeling those rough and tough details.
An out of service caboose functions as an office and crew hangout
The RIP track on my own Southside Industrial District is right at the front of the layout and doubles as the on-set staging for operating sessions. An out of service caboose is used as the office. The RIP track has a crane, spare equipment, and junk strewn about making a nice detail scene for visitors to focus in on. If I ever want to operate the module as part of a larger layout, I can remove the crane and use the front track as a mainline for through traffic.
The RIP track is a hive of activity and the source of some great modeling opportunities.
I enjoy swapping out maintenance-of-way equipment as I acquire new pieces and look forward to seeing what colorful rolling stock will be set out for repairs.
A gondola sits waiting for service on the RIP track at the end of the line on the Southside Industrial District